Preparing the Experiment
Learn what steps to take before starting your experiment.
Using a Pre-Cast Gel System
The key to a successful experiment is using the correct gel configuration for your needs.
Prepare the gel using the manufacturer’s recommendations. Use the table as a reference for determining the number of usable ports when using the MPX with pre-cast gels. The MPX works best with single-well pre-cast gels.
| Vendor | Well Designation | Sample Number | MW Marker Well | Usable Ports |
|---|---|---|---|---|
| Invitrogen | 2D | 1 | Yes | 19 |
| Bio-Rad | 2-D/Prep | 1 | Yes | 21 |
| C.B.S. Scientific | 1 Well | 1 | No | 23 |
Sample Preparation
Dilute sample to 1X using 4X Protein Sample Loading Buffer with fresh β-mercaptoethanol added to a final concentration of 2.5%. Heat at 95 °C for 5 minutes, then place on ice.
To help you decide the appropriate amount of sample to load:
-
Compare a multiwell comb used in previous experiments for your sample to determine how many wells of that comb fit into the well or wells of the gel you will be running for the MPX. Take into account the spaces between the wells which is usually ½ to ¼ the width of a well.
-
Add the total number of wells together and multiply by the amount of sample (micrograms per well) you have already shown gives a good signal.
For example, for a single-well, pre-poured gel (NP0323BOX), a 15-well comb from Nupage® NP0303BOX will fit the entire length of the well. Assuming ½ a well in between each of the 15 wells, there are approximately 22 wells total that would fit in the single well gel.
20 µg of NIH3T3 lysate per well has been determined to give a good signal: 22 wells x 20 µg lysate = 440 µg total of lysate to be loaded.
The volume of sample is also very important. A single-well comb is rated to hold 700 µl. However, you will want to limit your loading volume to approximately 200-300 µl total to achieve good band resolution.
Load half of the sample from each side and allow the sample meet in the middle. Restricting the sample load to 1/3 the well volume provides enough sample to cover the bottom of the well evenly yet promotes good stacking in the gel during electrophoresis.
For example:
-
440 µg of NIH3T3 lysate at 2.5 µg/µl = 176 µl
-
250 µl total loading volume using 4X Protein Loading Buffer = 250/4 = 62.5 µl
-
62.5 µl x 2.5% [F] β-mercaptoethanol = 1.6 µl
Therefore:
-
62.5 µl 4X Protein Loading Buffer + 1.6 µl β-mercaptoethanol + 176 µl NIH3T3 lysate = 240.1 µl
-
To make 250 µl total add 9.9 µl of water
Electrophoresis
Be sure to use the appropriate gel running buffer for the gel system you have chosen. For Pre-cast Novex® Bis-Tris Gel System, we recommend using MES SDS running buffer for best band resolution. Follow the standard procedure for electrophoresis as recommended by the manufacturer.
Note: It is very important to remove the comb from the gel cassette slowly and carefully to preserve a smooth, rather than jagged, well bottom for loading.
Transfer
Always handle membranes using clean forceps and do not touch membranes with gloved or ungloved hands. Once electrophoresis is complete, transfer proteins to an Odyssey Nitrocellulose Membrane or Immobilon®-FL PVDF Membrane using standard transfer procedures.
After transfer is complete, you can mark the membrane with a pencil or Odyssey Pen for alignments in the MPX or use Revert™ 700 Total Protein Stain for alignment
Note: The Odyssey Pen is suitable for writing on nitrocellulose or PVDF scanned on any of the Odyssey Imagers. Inks from other pens will autofluoresce in the 700 nm channel, potentially adding to background or causing artifacts on your image.
Marking the Membrane
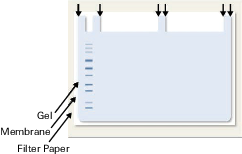
Mark the outside corners of the gel and sample wells with a pencil or Odyssey Pen on the membrane before separating the transferred gel from the membrane (Figure 148). The marks help align the membrane once you have placed it on the MPX. Allow the membrane to dry a minimum of one hour before assembling the MPX. The membrane can be dried on clean Whatman 3mm paper after marking.
Staining the Membrane
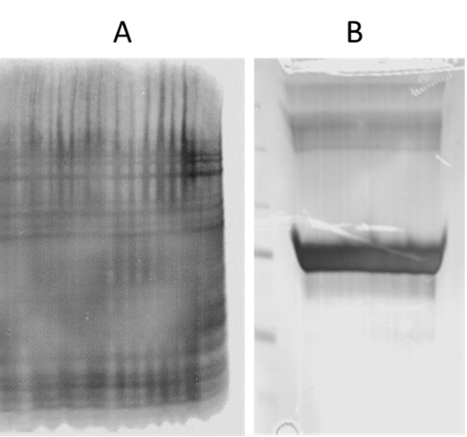
Dried membranes can be rehydrated with PBS or TBS for 5 minutes, stained with Revert™ 700 Total Protein Stain, and washed following the instructions in the pack insert. Staining with Revert 700 Total Protein Stain will show the exact location of the proteins to align with the channels in the MPX. The membrane can be destained, if desired, while in the MPX unit.