Imaging Nucleic Acid Gels on Odyssey Imagers
Background
A common method for separating and analyzing nucleic acid molecules is nucleic acid gel electrophoresis. Nucleic acid gel electrophoresis separates nucleic acids based on molecular size and subsequent ability to move through an agarose gel. Depending on the experiment, a nucleic acid sample can be stained during or after separation. The gel is placed in the electrophoresis apparatus and buffer added to submerge the gel. Nucleic acid samples and size markers are loaded then separated on the gel using an electric field. The separated nucleic acid molecules are visualized in the gel and compared to the band markers to estimate their sizes.
There are numerous commercial stains that may be appropriate for imaging the results of nucleic acid electrophoresis. Common stains include Ethidium Bromide (EtBr), SYBR® Safe DNA stain, SYTO™ 60 Nucleic Acid Stain, and GelRed® Nucleic Acid Stain.
Always verify that a stain’s excitation and emission wavelengths are compatible with the intended instrument prior to use.
Introduction
This technical note explains the respective stain imaging capabilities of each Odyssey Imager and the D‑DiGit Gel Scanner and how to effectively image results.
Each Odyssey Imager and the D‑DiGit Gel Scanner images specific stains. Depending on the desired stain, the choice of imaging system can vary.
Any inquiries regarding specific properties of a given nucleic acid stain should be directed to the respective vendor.
Nucleic Acid Gel Detection Information for the Odyssey M Imager
The following table shows nucleic acid gel detection information for the Odyssey M Imager and LI‑COR® Acquisition Software.
| Channel | Labels | Odyssey M Imager | |
|---|---|---|---|
| Excitation | Emission | ||
| 700 | SYTO 60 | 685 nm | 721 - 740 nm |
| 520 | GelRed, Ethidium Bromide, Midori Green | 520 nm | 570 - 610 nm |
| 488 | SYBR Safe, SYBR Green, GelGreen, GreenView | 488 nm | 519 - 543 nm |
Nucleic Acid Gel Detection Information for the Odyssey XF Imager and Odyssey XF Imager
The following table shows nucleic acid gel detection information for the Odyssey XF Imager, Odyssey XF Imager, and LI‑COR Acquisition Software.
| Channel | Labels | Odyssey XF Imager and Odyssey Fc Imager | |
|---|---|---|---|
| Excitation | Emission | ||
| 700 | SYTO 60 Stain | 685 nm | 716 - 746 nm |
| 600 | Ethidium Bromide, SYBR Safe, MIDORI Green Advance Nucleic Acid Stain, GelRed, GelGreen, Green View DNA Gel Stain | 520 nm | 573 - 637 nm |
Nucleic Acid Gel Detection Information for the Odyssey DLx Imager and Odyssey CLx Imager
The following table shows nucleic acid gel detection information for the Odyssey DLx Imager, Odyssey CLx Imager, and LI‑COR Acquisition Software.
| Channel | Labels | Odyssey CLx Imager and Odyssey DLx Imager | |
|---|---|---|---|
| Excitation | Emission | ||
| 700 | SYTO 60 Stain | 685 nm | 710 – 730 nm |
Nucleic Acid Gel Detection Information for the D‑DiGit Gel Scanner
The D‑DiGit Gel Scanner is designed to scan gels stained with safe alternatives to ethidium bromide. The D‑DiGit Gel Scanner is intended for use with the following stains.
-
SYBR Safe DNA Gel Stain
-
SYBR Gold Nucleic Acid Gel Stain
-
SYBR Green Nucleic Acid Gel Stain
-
GelRed Nucleic Acid Gel Stain
-
Diamond Nucleic Acid Dye
-
GelGreen Nucleic Acid Gel Stain
-
Midori Green Direct
-
Midori Green Advance DNA Stain
-
GreenView Nucleic Acid Gel Stain
-
GreenView Plus Nucleic Acid Gel Stain
-
GreenView Ultra DNA Gel Stain
Some stains may be more sensitive than others, allowing for visualization of smaller amounts of nucleic acid.
For more information on the D‑DiGit Gel Scanner, see the D‑DiGit Gel Scanner User Guide.
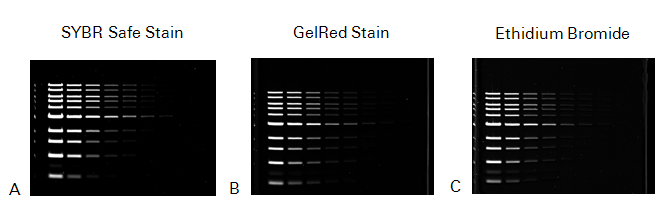
Stain Comparison
The following figure compares the results of three representative stains (i.e., SYBR Safe Stain, GelRed Stain, and EtBr) that were imaged on the Odyssey M Imager.
Separation and Detection Protocol
The following protocol explains how to perform DNA separation and detection on agarose gels using nucleic acid gel stain.
Suggested Materials
This section describes the suggested materials for DNA separation and detection on agarose gels. It is intended as a guide; other materials may be substituted.
-
High Grade or Molecular Biology Grade agarose OR E-Gel® Pre-cast agarose gels (Ethidium Bromide or SYBR Safe) (Life Technologies)
A low melting-point agarose may increase the degree of speckling on the digital image and is more difficult to use.
-
1X TAE or TBE buffer
-
Ethidium Bromide (EtBr, 10 mg/mL solution) OR SYBER Safe DNA Stain (10,000X concentrate in DMSO) OR GelRed Nucleic Acid Stain (10,000X concentrate in DMSO)
-
Gel tank and casting tray for running submersion gels
-
Power supply
Dispose of all gel and buffer solutions in accordance with the regulations of your facility.
In-Gel Prestaining
This section describes the steps for in-gel prestaining.
Prestaining may cause higher background than post-staining techniques.
Commonly used stains: EtBr and SYBR Safe DNA Gel Stain
Gel Preparation
-
Prepare desired agarose (0.8%, 1.0%, 1.2%, etc.) in 1X TAE or 1X TBE buffer.
-
Heat and dissolve the agarose in buffer using a microwave oven.
-
Cool solution until warm to the touch (50 °C) prior to adding a DNA stain.
Ethidium Bromide: Stock solutions are typically 10 mg/mL. Add EtBr to give a final concentration of 0.5 µg/mL.
SYBR Safe: Stock solutions are typically 10,000X. Add SYBR Safe to a final concentration of 1X.
-
Pour molten agarose solution into casting tray and set comb into place. Allow gel to solidify.
-
Remove comb and place gel in buffer tank. Do not allow the gel to become dry.
Both EtBr and SYBR Safe are positively charged stains and will migrate in the opposite direction of the DNA. If the stain is included only in the gel but not the buffer, there will be an area of high background indicating the stain has not migrated out of the gel.
Buffer Preparation
-
Prepare enough buffer (1X TAE or 1X TBE) to fill the apparatus and cover the gel.
-
Add a DNA stain to buffer.
Ethidium Bromide: Add 5 µL of 10 mg/mL EtBr stock solution to 100 mL of buffer (final concentration: 0.5 µg/mL).
SYBR Safe: Add 10 µL of 10,000X SYBR Safe stock solution to 100 mL of buffer (final concentration: 1X).
Electrophoresis and Destaining
-
Prepare samples with loading buffer and load in gel.
-
Electrophorese samples at 5-8 V/cm.
-
(Optional) Destain in water for 15-20 minutes. Repeat as necessary to remove background from the gel.
-
Image on an Odyssey Imager in the appropriate channel.
Post-Electrophoresis Staining
This section describes the protocol for post-electrophoresis gel staining.
Commonly used stains: EtBr and SYBR Safe DNA Gel Stain
Gel Preparation
-
Prepare desired agarose (0.8%, 1.0%, 1.2%, etc.) in 1X TAE or 1X TBE buffer.
-
Heat and dissolve the agarose in buffer using a microwave oven.
-
Cool solution until warm to the touch (50 °C) prior to pouring in casting tray.
-
Pour molten agarose solution into casting tray and set comb into place. Allow gel to solidify.
-
Remove comb and place gel in buffer tank. Do not allow the gel to become dry.
Buffer Preparation
-
Prepare enough buffer (1X TAE or 1X TBE) to fill the apparatus.
Electrophoresis
-
Prepare samples with loading buffer and load in gel.
-
Electrophorese samples at 5-8 V/cm.
-
When complete, remove gel from apparatus and place in a container suitable for staining, (i.e., black incubation box). Add enough stain to completely cover gel. Stain for approximately one hour with gentle agitation. Refer to the manufacturer's recommendation for stain concentration.
-
Rinse the stained gel in water for 15 minutes and image. If desired, the gel may be rinsed again to try to decrease any remaining background fluorescence.
E-Gel® Pre-Cast Agarose Gels
E-Gel pre-cast agarose gels containing EtBr or SYBR Safe are compatible with digital imaging on the D‑DiGit Gel Scanner or the Odyssey XF Imager or Odyssey XF Imager using the 600 channel. Follow the manufacturer’s protocols for sample preparation and gel electrophoresis parameters.
E-Gel gels must be imaged through the plastic cover.
Imaging Protocol
The following protocol explains how to image stained nucleic acids on agarose gels using Odyssey Imagers or the D‑DiGit Gel Scanner.
Each imager and scanner’s protocol and imaging software varies slightly. Please reference the imager or scanner’s respective steps in Table 4 when preparing to image.
DNA bands can be excised from a gel directly on the plexiglass casting tray of the D‑DiGit Gel Scanner. For detailed steps on band excision, please see the D‑DiGit Gel Scanner User Guide.
|
Odyssey M Imager |
Odyssey DLx Imager |
Odyssey DLx Imager |
Odyssey XF Imager |
Odyssey XF Imager |
D‑DiGit Gel Scanner |
|
Place gel face-up on the scan surface. |
Place gel face-up on scan surface. |
Place gel face-up on scan surface. |
Place gel face-up on imaging tray. |
Place gel face-up on imaging tray. |
Place gel face-up on scan surface. |
|
Open LI‑COR® Acquisition Software and start the scan. |
Open LI‑COR Acquisition Software and start the scan. |
Open LI‑COR Acquisition Software or Image Studio™ Software and start the scan. |
Place imaging tray in imaging drawer. |
Place imaging tray in imaging drawer. |
Open the software, select imaging time, and start the scan. |
|
|
|
|
Open LI‑COR Acquisition Software and start the scan. |
Open LI‑COR Acquisition Software or Image Studio Software and start the scan. |
|
Use a gel workflow in LI‑COR Acquisition Software for Odyssey Imagers; images from the D‑DiGit Gel Scanner cannot be imported into LI‑COR Acquisition Software. For gels placed face up on the Odyssey M Imager, Odyssey DLx Imager, Odyssey DLx Imager, and the D‑DiGit Gel Scanner, the captured image will be inverted. The image can be flipped from top to bottom with LI‑COR® Acquisition Software or Image Studio™ Software, depending on the imager used.
The correct focus offset for the Odyssey DLx Imager and Odyssey DLx Imager is ½ the thickness of the gel. The maximum offset is 4 mm. For more information, see the imager manuals.