Tissue Section Imaging Protocol
Introduction to Tissue Section Imaging
Tissue section imaging is useful for identifying cellular or tissue localization and expression of biological targets ex vivo. Targets can include proteins, DNA/RNA, and labeled small molecules. There are a variety of methods for target detection, including antibody-based detection, visual stains, and labeled probes. With the appropriate equipment, you can assess both the macro- and micro-locations of your target.
Although microscopy offers higher magnification and resolution over macroscopy, in order to visualize the intracellular location of your target, the samples must be examined one at a time using an appropriate microscope. Odyssey M, Odyssey DLx, and Odyssey CLx Imagers offer macroscopic imaging of tissue sections, allowing for detection of tissue- or region-specific localization and expression of targets. Additionally, these imagers can screen multiple tissue slides simultaneously, offering increased throughput for imaging.
Odyssey Imagers vary in both resolution and detection channels. The Odyssey M is compatible with both near-infrared (NIR) and visible fluorophores with a resolution of 5 µm, while the Odyssey DLx and the Odyssey CLx are compatible with NIR detection with a resolution of 21 µm.
The benefits of NIR are well documented and include low background autofluorescence, higher signal-to-noise ratios, and increased sensitivity. However, most microscopes are not configured for NIR fluorescence detection. If you plan on imaging slides on an epifluorescence microscope, this list of microscope requirements will help you get started: licorbio.com/microscope_requirements. Visible stains can be imaged on the Odyssey M Imager or most microscopes.
The table below summarizes the capabilities of each imager for tissue section imaging. Tissue sections of virtually any thickness and that have been prepared and stained by different methods are compatible with Odyssey M, Odyssey DLx, and Odyssey CLx Imagers.
| Instrument | Resolution | Channels |
|---|---|---|
| Odyssey DLx and Odyssey CLx | 21 µm | 700, 800 |
| Odyssey M | 5 µm | 488, 520, 700, 800, and RGB Trans (470, 525, 630) |
Overview of Immunohistological Staining
The figure below outlines a general protocol for preparing and staining tissue sections. Details and considerations for each step are described in the following section.

As seen in the workflow, several steps will vary for your specific assay. The scope of this document will focus on the most conventional protocol. For more details, refer to the protocol recommendations given by the antibody or probe manufacturer.
Some testing and optimization will be necessary to fine-tune each step for your specific assay.
Tissue Preparation
Fixation
The goal of fixation is to preserve the tissue’s cellular structure as closely as possible to its native state. However, fixation may damage or mask antigenic sites, potentially compromising the intensity of your immunostaining. You should test several fixative options to determine which fixative preserves both antibody binding and the structural integrity of the sample.
Fixative Options
There are two common classes of fixatives: cross-linking fixatives and precipitating fixatives.
Cross-linking fixatives
These fixatives act by creating covalent bonds between macromolecules in the tissue. Cross-linking can mask antigens, so these fixation methods are typically followed by an antigen retrieval step. The most common fixative in histology is formaldehyde gas dissolved in water.
-
Formalin is a formaldehyde solution with methanol added to prevent formaldehyde polymerization. Typically, formalin is purchased as a 10% solution in neutral buffer or prepared from a 37% (w/v) formaldehyde stock. Because of the added methanol, neutral buffered formalin penetrates tissue faster than paraformaldehyde.
-
Paraformaldehyde (PFA) is a polymerized form of formaldehyde, which does not contain methanol. PFA depolymerizes when dissolved in water and heated. PFA may be preferred over formalin for detecting cell-surface or structural proteins because the methanol in formalin permeabilizes the cell membrane and disrupts F-actin. PFA is typically prepared fresh at 4% (w/v) in neutral PBS.
Precipitating fixatives
Alcohols are commonly used to fix frozen sections and smears. Alcohols permeabilize as they fix and do not induce cross-linking, eliminating the need for later permeabilization and antigen retrieval steps.
Fixation Factors
Certain structures may be better preserved using specific fixation methods, so check the relevant literature for commonly used fixation methods for the tissue used in your assay. The following factors are important to consider:
-
pH: Most fixatives should be buffered to a pH between 7.2 and 7.4.
-
Osmolarity: Formalin is typically used as a 10% (v/v) solution in neutral buffer. PFA is typically used at 4% (w/v). Follow recommendations for your fixative.
-
Duration: The rule of thumb is to treat the tissue with fixative for at least 1 hour for every 1 mm of tissue thickness, but each fixative has a different rate of penetration. Review the recommendations for your chosen fixative.
-
Tissue thickness: Typically, samples should be under 4 mm thick to allow for penetration of the fixative. If the section is too thick, the center may not be fully fixed or have significant cell death and loss of tissue integrity due to delayed fixation.
-
Fixative volume: The fixative volume should generally be at least 20 to 50 times greater than the volume of the tissue fragment.
-
Temperature: Tissues are usually fixed at room temperature.
Some large tissues, like the brain, may be fixed by perfusion prior to animal necropsy to prevent postmortem degradation. Be sure to check the details of sample handling when you receive them.
Embedding
Tissue must be either fixed or frozen immediately after collection to prevent loss of tissue morphology and target protein degradation. Tissues are typically preserved paraffin-embedded or frozen. The table below compares these two approaches.
| Paraffin-Embedded | Frozen | |
|---|---|---|
| Fixation | Before embedding | After sectioning if needed |
| Sectioning Tool | Microtome | Cryotome |
| Viability | Years at room temperature | ~1 year at -80 °C |
| Advantages | Preserves cell structures and proteins | Preserves enzyme activity, proteins remain in native state |
| Disadvantages | Toxic fixatives, proteins are denatured, fixation can shrink tissue and mask epitope | Vulnerable to rapid degradation, ice crystals can disrupt tissue structure |
Paraffin-Embedded Tissue
Wax preserves tissue morphology and can be used to preserve tissues for years at room temperature. The most commonly used waxes are commercial paraffin waxes.
Because paraffin is immiscible with water, you must dehydrate tissues prior to paraffin embedding. Dehydration is accomplished by displacing water in the tissue with alcohol utilizing a series of alcohol baths at increasing concentrations, starting at 70% and finishing with 100% ethanol. After dehydration, the tissue is typically treated with a clearing agent, such as xylene, and finally with wax. Tissues are then embedded in wax in histology cassettes and allowed to harden prior to sectioning using a microtome. For full directions, refer to published protocols for your tissue or target of interest.
Example: Dehydrate tissues by incubating sections in 70% ethanol for 1 hr, twice, followed by 1 hr each of 80% and 95% ethanol. Next, incubate tissues three times in 100% ethanol for 1.5 hrs each, followed by xylene three times for 1.5 hrs each. Finally, incubate twice in paraffin wax at 58 °C for 2 hrs each. After the last incubation, embed tissue in molds with paraffin wax at 58 °C. Leave molds on a cold surface to harden completely prior to sectioning.
Frozen Tissue
Freezing tissue without fixation allows you to preserve enzyme and antigen function in your sample. The tissue sample must be kept thin (< 5 mm) to quickly freeze and prevent the formation of ice crystals and artifacts in the sample. Properly preserved tissue can be kept for approximately one year at -80 °C.
Tissue can be embedded and frozen in optimal cutting temperature (OCT) compounds made of water-soluble glycols and resins prior to sectioning with a cryotome.
Slide Preparation
Cut Sections
For microscopy, sections are generally cut to a thickness of 4 to 10 µm so that the section is one cell thick. Tissues of any thickness can be imaged on an Odyssey M, Odyssey DLx, or Odyssey CLx Imager. Optimal thickness depends on the tissue and embedding method. The following tools are commonly used to cut tissue sections.
• A microtome is used to cut thin slices of paraffin-embedded tissue.
• A cryotome is used to cut thin slices of frozen tissue sections.
Once cut, tissue sections are mounted on microscope slides and allowed to dry overnight prior to immunohistochemistry. Alternatively, sections can be transferred to well plates for free-floating section imaging.
Remove Embedding Compound
For paraffin-embedded sections, the paraffin is removed by incubating slides in a clearing agent, such as xylene. The tissue is then rehydrated by incubating in decreasing concentrations of alcohol followed by water.
Example: Incubate slides in xylene two times for 10 min each. Next, incubate for 5 min each in 100% ethanol, 95% ethanol, 70% ethanol, 50% ethanol, and, finally, water.
If you have used OCT to preserve your frozen tissue, you do not need to remove it before imaging. Consult the manufacturer's instructions for more information. If frozen sections were not fixed prior to being embedded, they can be fixed in cold methanol or acetone and then hydrated in PBS.
If the animal was injected with a fluorescent agent, further tissue staining may not be needed.
Do not allow rehydrated sections to dry out during the staining procedure.
Free-Floating Sections
In free-floating immunohistochemistry, sections are not mounted until after the immunohistochemistry process is complete. Sections are stained while floating in solution, typically in a large-welled plate. Because the antibody can penetrate the tissue from all sides, thicker sections can be used compared to slide-mounted sections (20 to 50 µm).
This paper shows examples of free-floating tissue section use (licorbio.com/brain_sections).
Immunostaining
Perform Antigen Retrieval
Fixation can alter protein biochemistry, causing the epitope of interest to be masked from the primary antibody by cross-linking of amino acids within the epitope or cross-linking with unrelated biomolecules at or near the epitope.
The process of epitope/antigen retrieval refers to unmasking the epitope to restore epitope/antibody binding. It should only be performed if necessary because harsh conditions, including acidic or basic pH and high temperatures, can cause the tissue to dissociate from the slide.
Epitope retrieval is generally not recommended for frozen sections.
An epitope can be unmasked in several ways.
-
Heat-induced epitope retrieval (HIER): Epitopes are unmasked by heating the sections in a buffered solution. Citrate and EDTA-based buffers are commonly used. A variety of heating sources can be used, including a microwave, water bath, pressure cooker, or vegetable steamer. Epitope unmasking improves as temperature increases. Water baths and microwaves typically achieve temperatures of 100 °C, while pressure cookers can reach up to 120 °C.
-
Proteolytic-induced epitope retrieval (PIER): Enzymes are used to unmask the antigen. Examples of enzymes include trypsin, proteinase k, pronase, or pepsin.
-
Room temperature epitope retrieval (RTIER): Acid, typically formic acid (pH 2) or hydrochloric acid (pH 1), is used to reverse cross-linking.
To find the best antigen retrieval method for your target, refer to the datasheet of your primary antibody or staining protocol from the manufacturer’s website. This step and will need to be optimized for each target.
Permeabilize
Permeabilization facilitates the entry of antibodies into the cells. The extent of permeabilization required depends on the target. If your focus is a cell-surface protein, little, if any, permeabilization may be required. Some fixatives will permeabilize the tissue during fixation. Permeabilization, like fixation, can affect the morphology of cells, including the antigen of interest.
Detergents commonly used for permeabilization include NP-40, Triton® X-100, Tween® 20, and saponin. After permeabilization, wash the slide in water or PBS. Refer to the In‑Cell Western™ Assay Development Handbook (licorbio.com/icw-handbook) for more detailed information on permeabilization methods.
Block
Create a Hydrophobic Barrier
Prior to adding blocking solution or primary antibodies, draw a barrier on the slide around the tissue section using a hydrophobic pen. The barrier keeps reagents from flowing off the tissue section, allowing you to apply solutions directly to the slide in smaller amounts.
Block Endogenous Biotin or Enzyme Activity
Blocking endogenous biotin or enzymatic activity may be needed depending on your detection method. To determine if supplemental blocking of enzymatic activity is needed, add chromogen substrate and/or labeled probe to a control tissue section after antigen retrieval. If endogenous levels of the enzyme produce staining, additional blocking is needed, as described below. This step is typically not needed for fluorescence detection.
Block endogenous biotin
If you intend to use a secondary antibody conjugated to biotin, block endogenous biotin by incubating the tissue in unlabeled streptavidin or avidin, followed by an excess of unlabeled biotin. This will prevent off-target binding of your labeled streptavidin-conjugated secondary antibody.
Block endogenous peroxidase
If horseradish peroxidase (HRP) is used for chromogen development, you should quench endogenous peroxidase by incubating slides in 0.3 to 3.0% (v/v) peroxide in methanol.
Block endogenous alkaline phosphatase
If the secondary antibody is labeled with alkaline phosphatase (AP), endogenous AP activity can be blocked with the AP inhibitor levamisole at 1 mM concentration.
These blocking steps may interfere with primary antibody binding and can be performed after the primary antibody incubation and wash step if preferred.
Block Non-Specific Antibody Binding
Target detection can be improved by blocking the non-specific binding of your antibody to the tissue section. Intercept® Blocking Buffer (TBS, PBS, or protein-free), BSA, milk, or serum are commonly used to reduce non-specific binding.
Keep the blocking agent consistent throughout the staining process.
Add blocking buffer directly to each tissue section and incubate the slides in a humidified chamber to prevent drying. Each blocking solution will have specific incubation conditions.
Tip: A humidified chamber can be purchased or created by placing wet paper towels in a tray. Line a tray with pipets in parallel. Lay slides across the pipets to keep the solution from draining from the slides. Cover the tray with a lid, foil, or plastic wrap.
Example: Add Intercept® Blocking Buffer, 1 to 5% (w/v) serum in buffer, or preferred blocking buffer directly to each tissue section on slide. Incubate at room temperature for 1 hr in humidified chamber. After incubation, tip slide to remove blocking buffer prior to adding primary antibody.
Do not block with serum from the same species in which the primary antibody was raised. For example, if your primary antibody is mouse anti-target, do not block with mouse serum. You can use serum from the source species of the secondary antibody.
Incubate With Primary Antibody
Tip the slide to pour off blocking buffer prior to adding primary antibody. Check the antibody datasheet to verify the antibody is validated for IHC/ICC/IF staining.
Dilute the primary antibody in the same blocking buffer used in the previous step. The addition of detergent helps prevent non-specific interactions. A concentration of 0.1 to 0.2% Tween® 20 is commonly used. Refer to the antibody datasheet from the vendor for recommended antibody concentration and incubation conditions.
Incubate slides in a humidified chamber to keep them from drying out. Most primary antibodies perform well when incubated overnight at 4 °C. Some may also perform well at room temperature or 37 °C for shorter incubation times.
For multiplexed target detection, be certain each primary antibody is derived from a different host species or subclass and is validated to confirm there is no cross-reactivity. If all antibodies have the same optimal incubation times and temperatures, they can be incubated simultaneously.
After incubating the primary antibody, wash the slides with a buffer containing detergent. Use the same buffer system as in the previous steps. TBS + 0.1% Tween 20 (TBS-T) is commonly used.
If the primary antibody is conjugated to a fluorophore, no secondary antibody incubation is needed.
Example: Dilute primary antibody in blocking buffer with 0.1 to 0.2% Tween 20 added. Incubate overnight at 4 °C in a humidified chamber. After the primary antibody incubation, wash slides three times for 5 min each with TBS + 0.1% Tween 20 (TBS-T).
Incubate With Secondary Antibody
Dilute the secondary antibody in the same blocking buffer used in previous steps with the addition of detergent. A concentration of 0.1 to 0.2% Tween® 20 is commonly used. Refer to the antibody datasheet for recommended antibody concentration. For IRDye® Secondary Antibodies, the recommended starting dilution is 1:200. For VRDye™ Secondary Antibodies, the recommended starting dilution is VRD Rec.. Incubate slides in the humidified chamber to keep slides from drying out.
For detection of multiple targets, all secondary antibodies can be incubated simultaneously as long as they are compatible and will not bind each other. For example, do not combine goat anti-mouse with rabbit anti-goat secondary antibodies. Make sure secondary antibodies are highly cross-adsorbed to further prevent cross-reactivity.
Fluorophore-Conjugated Antibodies
For multiplex detection, make sure fluorophores are compatible and that wavelengths are separated enough to prevent bleedthrough for specific detection of each. For example, the 488, 700, and 800 nm channels on the Odyssey M Imager are far enough apart for specific detection, while the 488 and 520 nm channels are not. Also, consider that cellular autofluorescence is brightest in the visible wavelengths, so NIR fluorophores will give you better sensitivity and reduced background. Refer to Fluorophore Compatibility for selecting fluorophores compatible for detection with your Odyssey Imager.
Example: Prepare secondary antibodies in blocking buffer containing 0.1 to 0.2% Tween® 20. For IRDye Secondary Antibodies, the recommended starting dilution is 1:200. Add secondary antibody directly to tissue sections and incubate in the humidified chamber protected from light for 1 hr at room temperature. After incubation, wash slides three times for 5 min each with TBS-T.
Enzyme-Conjugated Antibodies
When using secondary antibodies conjugated to an enzyme, such as HRP or AP, you will need to add a substrate. The enzyme breaks down the substrate into a visible precipitate that stains the tissue. The color of the stain depends on the substrate used.
The stain should be developed immediately after secondary antibody incubation and subsequent washes, as enzymes are not stable at room temperature. Stain development must be watched closely, and the reaction must be quenched as soon as staining is satisfactory. Refer to the manufacturer’s guidelines for optimal incubation times and conditions.
Biotin-Conjugated Antibodies
Biotin binds strongly to its ligands avidin and streptavidin. Targets labeled with biotin are often visualized by adding avidin or streptavidin conjugated to a fluorophore or enzyme, like HRP or AP, for chromogenic development, as described above.
Counterstain
Slides can be counterstained to visualize overall tissue morphology. Common fluorescent counterstains include nuclear stains, like DAPI, or fluorophore-conjugated phalloidin to stain F-actin. See Fluorophore Compatibility to select an appropriate counterstain.
Counterstains are typically performed during or after the secondary antibody incubation. Follow manufacturer’s instructions.
Odyssey Imagers do not detect DAPI or Hoechst. Alternatives include DRAQ5 or phalloidin conjugated to a fluorophore (see Fluorophore Compatibility).
Visible counterstains for IHC include hematoxylin, nuclear fast red, and methyl green. These can be detected with the RGB channel on the Odyssey M Imager.
Imaging
Mount
Fluorescent Detection
Mounting media can protect against physical damage of the sample and photobleaching of fluorescent dyes. Some mounting media will solidify the coverslip on the slide, while others will remain liquid. For liquid mounting media, the edges of the coverslip will need to be sealed with epoxy or clear nail polish. Mounting media is typically added directly to the slide. The coverslip is carefully placed on top to avoid creating air bubbles.
Low-fluorescence mounting media are available from several vendors. Test your mounting medium before using it on valuable samples. Media can be tested by imaging a drop of it on a slide or coverslip to check for autofluorescence. Contact your local Solutions & Support Scientist for more help.
It is important to use low-fluorescence mounting media. Some mounting media have fluorescent properties, so check with the manufacturer to ensure it won’t interfere with fluorophore detection.
Visible Detection
For visible stains, dehydrate slides through a series of increasing concentrations of alcohols followed by xylenes (reversing the rehydration process described in Remove Embedding Compound) and allow slides to air dry prior to mounting the coverslip. Clear, adhesive mounting media is typically used.
Example: To dehydrate slides, incubate slides for 5 min each in water, 50% ethanol, 75% ethanol, 95% ethanol, and twice in 100% ethanol. Next, incubate twice in xylene for 10 min each. To mount, add a small amount of mounting media directly to the slide and place the coverslip carefully to avoid creating air bubbles.
Image
Tissue sections can be imaged using microscopy techniques or on the Odyssey M, Odyssey DLx, or Odyssey CLx Imager.
Visible fluorophores and stains can only be imaged on the Odyssey M Imager.
Ensure slides are completely dry before imaging on an Odyssey Imager to prevent the mounting media or sealant from damaging the scan surface.
Imaging With Image Studio™ Software (Odyssey CLx Only)
-
Clean the slides and imaging surface with 70% ethanol or 70% isopropanol.
-
Place slides with the coverslip facing up (or tissue face up) on the imaging surface.
-
Select the Slide preset under the Custom
 drop-down. .
 -
Select
 for the channel intensity.
 -
Scan Controls:
-
 Resolution: 21 µm
 -
 Quality: Medium
 -
 Focus Offset: 1 mm (depending on slide thickness)
-
-
Use Draw New
 to indicate the scan area.
 -
Use Add to add more scan areas.
-
Click the green Start
 button to begin acquisition.
For further details on image acquisition using Image Studio™ Software, please see the Image Studio Software Video Tutorials.
Imaging With LI‑COR® Acquisition Software (Odyssey M, Odyssey DLx, or Odyssey CLx)
Follow the instructions below to image your tissue section slides using LI‑COR Acquisition Software.
- Clean the slides and imaging surface with 70% ethanol or 70% isopropanol.
- Place slides with the coverslip facing up (or tissue face up) on the imaging surface.
-
Start LI‑COR Acquisition Software
 .
. -
From the Getting Started page, choose Scan.

-
On the Connect page, select your Username and choose the imager you want to use from the Imager list.
Click Connect.
-
Choose on the Choose Assay page.

Choosing the appropriate assay will ensure that the image is available for the correct analysis workflow in Empiria Studio® Software.
-
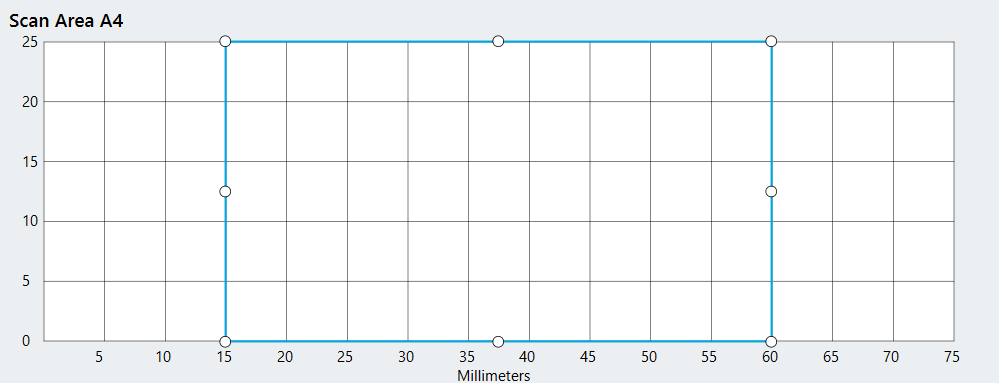
Create a Scan Area for each slide that you want to image by selecting the area around the location of each slide on the Scan Surface.
Then draw a Scan Area where the sample is on that slide. Avoid areas used for slide and sample labeling.
Tip: Use Start Scan Preview to ensure the Scan Area encloses only the sample. Scanning only the sample will reduce acquisition time and can improve image focus.
Click Next.
-
On the Detection Options page, click the Select Channels button beside each Scan Area. For each, be sure to select the detection channels you will be imaging.
Tip: Click the Autofill
 button next to Detection Options for one slide to apply the options for that slide to all slides below it in the list.
Figure 164. Available detection channels on the Odyssey M Imager. 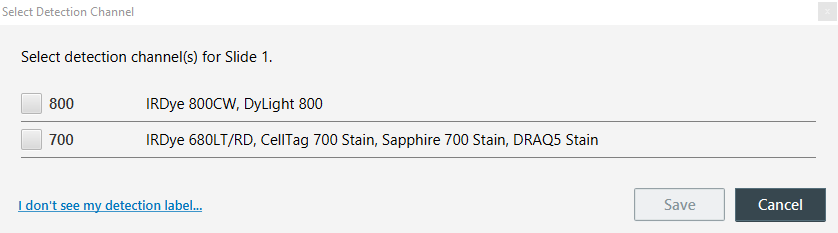
Figure 165. Available detection channels on the Odyssey DLx and Odyssey CLx Imagers. -
Click Scan to begin the scan.
Supplemental Materials
Controls
Controls can confirm the specificity of binding. The table below lists common IHC controls.Hewitt, S. M., Baskin, D. G., Frevert, C. W., Stahl, W. L., and Rosa-Molinar, E. (2014). Controls for Immunohistochemistry: The Histochemical Society's Standards of Practice for Validation of Immunohistochemical Assays. Journal of Histochemistry & Cytochemistry, 62(10), 693–697. https://doi.org/10.1369/0022155414545224
| Control | Description | Purpose |
|---|---|---|
| Secondary antibody only | Slide stained with secondary antibody but not primary antibody | Shows non-specific binding of secondary antibody |
| Negative | Tissue known to have no expression of the target | Shows non-specific binding of primary antibody |
| Positive | Tissue known to express the target | Confirm the assay is working |
| Isotype | Primary antibody of same isotype against a target not expressed in the tissue | Shows non-specific interaction between the tissue and primary antibody |
| Endogenous tissue background | Unstained slide | Shows tissue autofluorescence |
Fluorophore Compatibility
Use the table below to ensure fluorophore compatibility with your Odyssey Imager. For questions on additional fluorophores, contact your local Solutions & Support Scientist.
Only the Odyssey M Imager has a white light channel for detection of visible stains and chromogens.
| Fluorophore | Odyssey DLx or Odyssey CLx |
Odyssey M | Channel (nm) |
|---|---|---|---|
| Alexa 488 | X | 488 | |
| DyLight 488 | X | 488 | |
| GFP | X | 488 | |
| VRDye™ 490 | X | 488 | |
| Alexa 546 | X | 520 | |
| Alexa 555 | X | 520 | |
| Cy3 | X | 520 | |
| DyLight 550 | X | 520 | |
| FITC | X | 520 | |
| VRDye 549 | X | 520 | |
| Alexa 680 | X | X | 700 |
| Cy5.5 | X | X | 700 |
| DRAQ5 | X | X | 700 |
| DyLight 680 | X | X | 700 |
| IRDye® 680LT | X | X | 700 |
| IRDye 680RD | X | X | 700 |
| iRFP713 | X | X | 700 |
| DyLight 800 | X | X | 800 |
| IRDye 800CW | X | X | 800 |
References
1. Boenisch, T., Farmilo, A.J., Stead, R.H., Key, M., Welcher, R., Harvey, R., and Atwood, K.N. (2001). Immunochemical Staining Methods: 3rd Edition. DAKO Corporation. http://www.ihcworld.com/_books/Dako_Handbook.pdf
2. Hewitt, S. M., Baskin, D. G., Frevert, C. W., Stahl, W. L., and Rosa-Molinar, E. (2014). Controls for Immunohistochemistry: The Histochemical Society's Standards of Practice for Validation of Immunohistochemical Assays. Journal of Histochemistry & Cytochemistry, 62(10), 693–697. https://doi.org/10.1369/0022155414545224
3. Howat, W.J. and Wilson, B.A. (2014). Tissue fixation and the effect of molecular fixatives on downstream staining procedures. Methods, 70(1), 12-19. https://doi.org/10.1016/j.ymeth.2014.01.022
4. Im, K., Mareninov, S., Diaz, M.F.P., and Yong, W.H. (2019) An Introduction to Performing Immunofluorescence Staining. Methods in Molecular Biology, vol 1897. https://doi.org/10.1007/978-1-4939-8935-5_26
5. MacNeil, T., Vathiotis, I.A., Martinez-Morilla, S., Yaghoobi, V., Zugazagoitia, J., Liu, Y., and Rimm, D.L. (2020). Antibody validation for protein expression on tissue slides: a protocol for immunohistochemistry. Biotechniques, 69(6), 461-469. https://doi.org/10.2144/btn-2020-0095
6. Reuter, J. (2011). Immunofluorescence on Frozen Tissue Sections. Bio-101, e163. https://doi.org/10.21769/BioProtoc.163
7. Robertson, D., Savage, K., Reis-Filho, J.S., and Isacke, C.M. (2008). Multiple immunofluorescence labelling of formalin-fixed paraffin-embedded (FFPE) tissue. BMC Molecular and Cell Biology, 9(13). https://doi.org/10.1186/1471-2121-9-13
8. Xiao, X., Feng, Y.P., Du, B., Sun, H.R., Ding, Y.Q., and Qi, J.G. (2017). Antibody incubation at 37°C improves fluorescent immunolabeling in free-floating thick tissue sections. Biotechniques, 62(3),115-122. https://doi.org/10.2144/000114524