Pearl Clean Box
Pearl Clean Box
Description
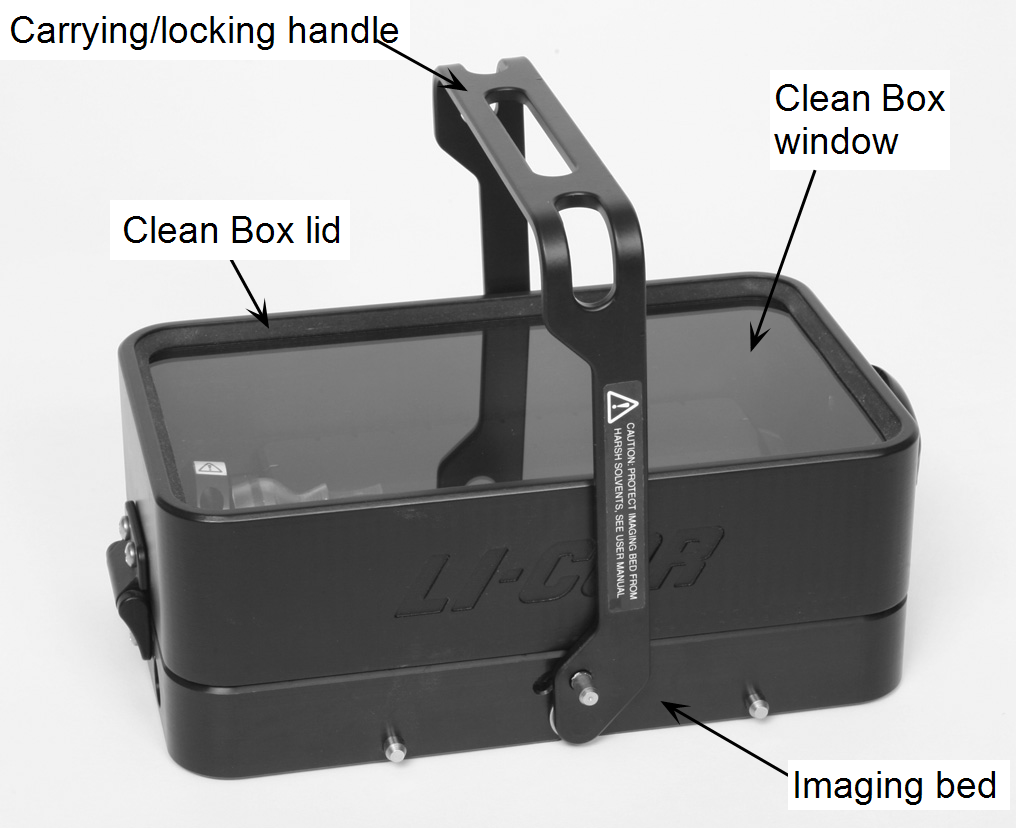
The purpose of the Pearl Imager Clean Box is to provide a HEPA-filtered closed environment for mice requiring added protection from exposure to pathogens.
The lower portion of the Clean Box is an imaging bed with a heater plate similar to the standard Pearl imaging bed. The heater plate can be used to maintain the body temperature of the mouse when the Clean Box is locked in place on either the Pearl Imager or Pearl Docking Station. The handle of the Clean Box is used to lock it in place using the same “rotate down” method as the standard imaging bed. When locked in place, anesthesia gas will be supplied to the mouse via the standard Pearl nose cone. HEPA filters are provided for both the Pearl Imager and Pearl Docking Station to protect the mouse by filtering the anesthesia gas. When the Clean Box is undocked, the gas ports automatically close.
The Pearl Clean Box window is a specially coated cell cast acrylic window for optimum light transmission and durability. The coating on the exterior surface of the window will help minimize smudging and scratching. The interior surface is coated to minimize scratches.
Important: Do not discard the clear protective cover for the Clean Box during unpacking. The cover protects the imaging window of the Clean Box during storage and transfer from the Docking Station to the Pearl Imager.
Installation
Installation consists of installing HEPA filters and installing a nose cone. The Clean Box should also be sanitized before initial use as described later in this chapter.
Connecting a HEPA Filter to the Docking Station
When using the Pearl Clean Box, one of the included HEPA filter assemblies should be installed between the anesthesia supply tube and the docking station rotameter as described in System Overview, Step #5).
Connecting a HEPA Filter to the Pearl® Imager
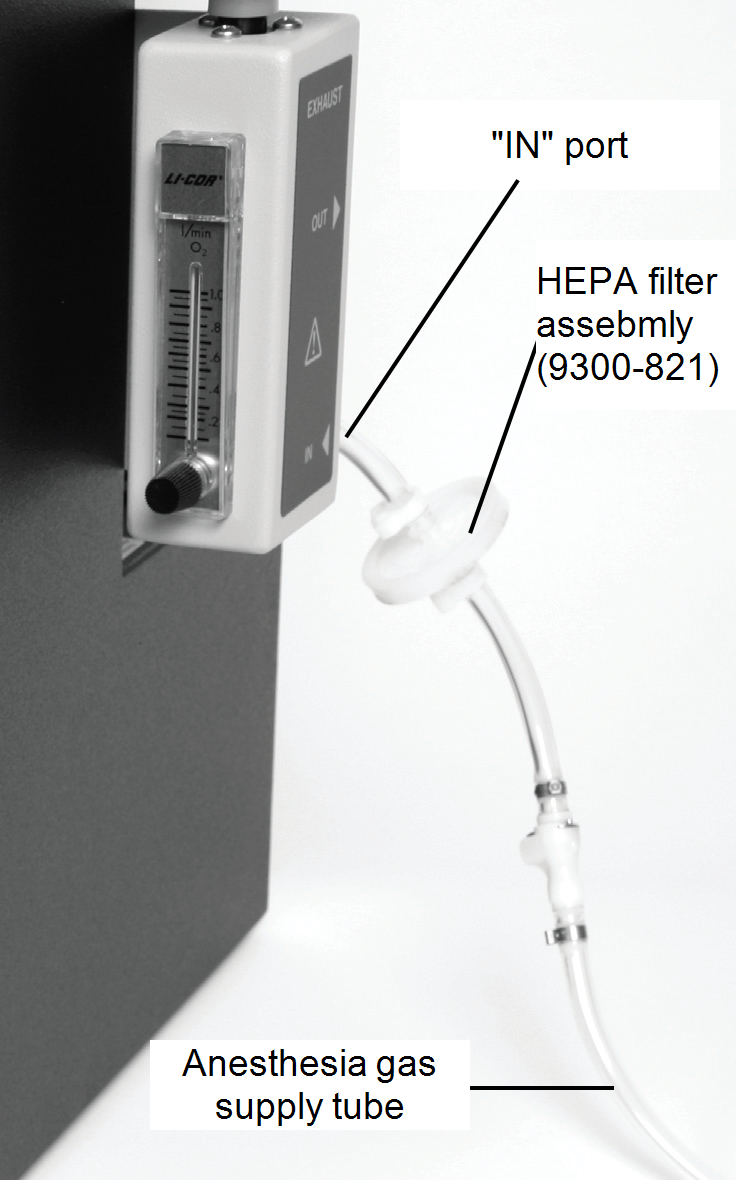
Use the procedure below to connect a HEPA filter between the anesthesia gas supply line and the Pearl Imager.
- If necessary, disconnect the existing anesthesia supply tube from the port labeled “IN” on the rotameter of the Pearl Imager.
- Connect one of the provided HEPA filter assemblies (packaged with the Pearl Clean Box) to the port labeled “IN” on the Pearl rotameter. The gender of the connector assures the filter will be in the correct orientation after it is plugged in.
- Connect the opposite end of the HEPA filter assembly to the provided anesthesia supply tube provided with the Pearl Imager.
Nose Cone Installation and Replacement
Nose cones are provided in the spare parts kit for the Pearl Clean Box. To install a nose cone, press the new cone on to the black nose cone base (Figure 136). To prevent leaks, make sure the new nose cone is fully seated and then install a nose cone plug
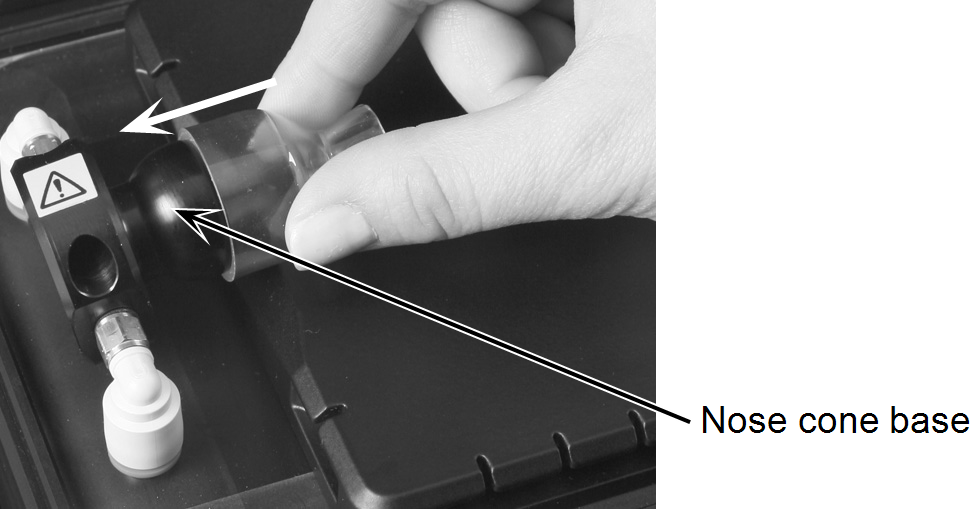
The nose cone may need to be replaced occasionally for sanitary or other reasons. New nose cones can be purchased from LI‑COR. The nose cone can be removed by grasping the tip and pulling it straight off (parallel to the imaging bed surface) until the nose cone slips off its base.
Sanitizing the Pearl Clean Box
CAUTION: Do not sterilize the Pearl Clean Box in an autoclave.
Damage will result.
ATTENTION:
Ne stérilisez pas la boîte propre de Pearl dans un autoclave. Des endommages résulteront.
There are two considerations when sanitizing the Pearl Clean Box. The most important is to sanitize the interior of the Clean Box to protect the health of the immunocompromised mouse. The second is to keep the Clean Box window and imaging bed clear of any dirt, smudges, or foreign debris that may be detected during infrared imaging.
Before cleaning, read Pearl Clean Box. For the initial cleaning, use Heavy Duty Optical Wipes with a solution of 0.5% chlorine bleach . Clean the imaging bed surface, interior surface of the Clean Box lid, and interior surface of the Clean Box window. Check for smudges on the interior of the window. If necessary, perform a final cleaning using the LI‑COR® Optical Tissue. Smudges on the window could be visible in all images acquired using the Clean Box, so clean thoroughly and carefully.
With infrared imaging, residue on the imaging bed surface from previous image acquisitions may be visible in new image acquisitions. If necessary, between image acquisitions, clean just the imaging bed surface with 0.5% chlorine bleach . Ethanol or isopropanol can be also used as a cleaning solution for applications where chlorine bleach is not required. If necessary, clean any fingerprints or smudges from the exterior surface of the window as described in Pearl Clean Box.
CAUTION: Strong solvents, including DMSO, will permanently discolor the imaging bed surface. Avoid all contact. In addition, any IRDye® products in DMSO will incorporate into the surface of the imaging bed and will be visible in images.
ATTENTION:
Les dissolvants forts, y compris DMSO, décoloreront de manière permanente la surface du lit d'image. Évitez tout contact. En outre, tous les produits d'IRDye dans DMSO incorporeront à la surface du lit et seront évidents dans les images.
Whenever possible, inject the animal on a separate surgical bed and clean any exterior dye product on the animal before transferring the animal onto the Pearl Imager Clean Box. In the event that the Clean Box becomes contaminated with dye, wipe with Nair® hair remover and thoroughly clean immediately and dry before use.
Clean Box Operation
- Open the Clean Box and clean the imaging bed surface with 0.5% chlorine bleach as described above. To open, swing the latch down 90° until horizontal, rotate 180° counter clockwise, and swing the latch up before lifting the Clean Box lid.
- Close the Clean Box, place the Clean Box on the Pearl Docking Station and lock it in place.
- Turn on the docking station and wait for the heater plate to reach the temperature set point (green “running” icon is ON constantly).
- Note: Alternatively, the heater plate can be warmed by locking the Clean Box in the Pearl imaging drawer until the set point temperature is reached
- Make sure the nose cone plug is in place and start the flow of anesthesia gas as described in System Overview. Observe all cautions for the use of isoflurane gas. Wait about a minute for the system to be primed with isoflurane gas.
- Unlatch and open the Clean Box lid, remove the nose cone plug, and place the plug in its holder. Remove the mouse from the anesthesia induction chamber and slide the muzzle of the mouse into the nose cone
- IMPORTANT: Observe the tail of the mouse and make certain the tail will not be pinched between the Clean Box lid and imaging bed when the lid is closed.
- Close and latch the Clean Box lid, then install the Clean Box cover on the Clean Box to prevent touching the window or spotting the window with liquids.
- If using the Pearl Docking Station, undock the Clean Box and move it to the Pearl Imager imaging drawer and lock the Clean Box into the imaging drawer.
- IMPORTANT: Move the Clean Box quickly. Anesthesia gas does not flow while the Clean Box is undocked.
- Remove the Clean Box cover to expose the window, close the imaging drawer, and acquire an image
- After acquiring images, open the imaging drawer, undock the Clean Box and move it back to the mouse holding facility or recovery chamber where the mouse can be removed.
- When the imaging session is complete, replace the Clean Box cover to protect the Clean Box window during storage.
Maintenance of the Clean Box Window
Proper care and maintenance are important to preserve the optical characteristics of the Pearl Clean Box window. The following instructions are recommended for the proper care of the window.
Scratches
The window top and bottom surfaces are treated with a hard coating that aids in scratch prevention under normal use. However, the window can still be scratched by dirt or other foreign objects. Reasonable care should be taken to avoid scratching the window surfaces. Do not use paper towels or similar products to clean the surfaces. Compressed, clean dry air is the preferred method of removing foreign debris. If compressed air does not remove the debris, a soft lint-free optical cleaning tissue should be used.
Smudging
Due to the light transmission characteristics of the window, it will be very easy to see smudges on the window surfaces. To help prevent smudging, the exterior surface of the window has an anti‑smudge coating. For optimal optical performance, the interior window surface does not have this coating. Take extra care to avoid contact with the interior surface in order to prolong the lifetime of the window.
Chemicals
Chemicals such as chlorine bleach , ethanol, and isopropanol are NOT detrimental to the optical properties of the window. CAUTION: The window CAN be damaged by chemicals such as toluene, acetone, benzene, ethylene dichloride, and other highly acidic or alkaline reagents.
Cleaning Procedure
Dust particles are the most common contaminant. Compressed, clean dry air is recommended as a first step in cleaning the Clean Box window since dust particles can become embedded in cleaning cloths and scratch the surface.
Should compressed clean dry air prove insufficient, use LI‑COR® Optical Tissue and LI-COR Optical Cleaner. Apply a few drops to an optical tissue and gently clean the window with a circular motion. Follow with a second dry tissue to remove any residual liquid or streaks.
For heavy duty cleaning of the window or entire Clean Box, use durable Heavy Duty Optical Wipes. A final cleaning of the window surface using the LI‑COR Premium Grade Optical Tissue, as discussed above, may be required.
Each of the cleaning products mentioned above can be ordered as the Clean Box Cleaning Kit or individually from LI-COR.
Replacing Heater Plate Contact Pins
Over time, the heater plate contact pins on the bottom of the imaging bed that mate with the imaging drawer and docking station may wear or become bent and no longer function as intended.