Recertify the Verification Plate
The Odyssey verification plate does not automatically come with the purchase of an instrument. More information about verification plates is available on the regulatory products page.
The Odyssey verification plate should be sent to LI-COR annually for recertification. Contact regulatory@licorbio.com to request the service (service number 926-75005).
During the recertification process, the verification plate will be compared to a standard. The plate will be cleaned and/or repaired as necessary. You will receive a certificate of verification that shows your plate's variation from the standard.
Verification Plate for the Odyssey® Sa Imager
Before You Begin
Re-certify the verification plate annually. Contact regulatory@licorbio.com to request the re-certification service (service number 926-75005).
Handle the verification plate with powder-free gloves.
Store the verification plate in the envelope it ships with.
Only touch the plate by the black outer casing.
Never touch the stainless steel part of the plate.
Never attempt to clean the plate yourself. If the stainless steel face becomes contaminated, return the plate to LI‑COR Biosciences for cleaning and re-certification.
Position the Plate
-
Ensure the instrument's plate carrier is clean, dry, and free of any residue or dust.
-
Place the verification plate in the plate carrier with the text facing up and the alignment grid aligned with the lower left corner of the plate carrier.
For the second scan, rotate the plate 180 degrees.
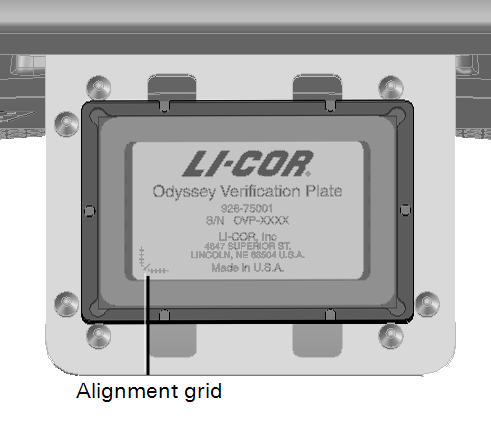
Scan Position 1
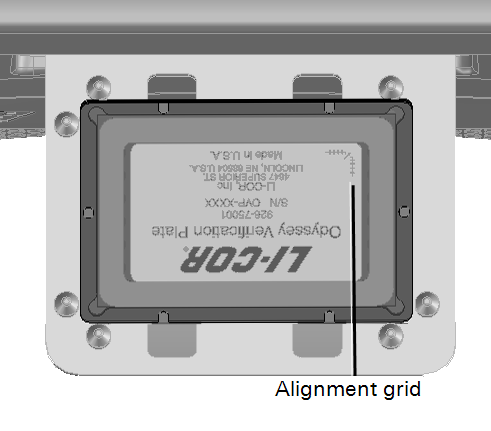
Scan Position 2
Begin Scan
-
Open Image Studio™ Software with a Work Area created specifically for verification plate images.
-
Connect to the instrument.
-
On the Acquire tab, ensure the following settings are chosen.
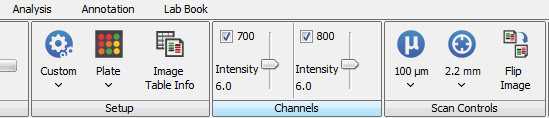
Setup group: Choose the Plate preset.
Channels group: Set intensity for both channels to 6.
Scan Controls group: Set the Resolution to 100 µm. Set the Focus Offset to 2.2 mm by using the Custom Focus Offset option at the bottom of the Focus Offset menu.
-
Click Start
 .
. -
Perform a second scan with the same settings, but with the plate in Scan Position 2.
-
Rotate the Scan Position 2 image to the same orientation as the first image.
On the Image tab, click Rotate or Flip > Rotate 180°.
Note: This process creates a new image. Use the new, rotated image for analysis.
Analyze Odyssey Sa Verification Plate Data (PN 926-75001)
Copy data from verification plate (PN 926-75001) scans into the workbook provided below to quickly calculate 700 and 800 channel coefficients of variation (CV).
-
On the Analysis tab, ensure Plate is chosen in the Type group.
-
Ensure all the following columns are in the Plate Wells table in the order shown.

Add missing columns using the procedure appropriate for your version of Image Studio.
Image Studio 4.x or 5.x: Click Columns
 above and to the right of the tables.
Image Studio 3.x or earlier: On the Table tab, click Add/Remove Columns.
-
On the Plate Analysis tab, ensure the following are set up correctly.
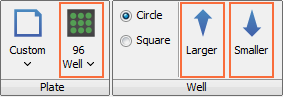
Plate group: Choose the 96-Well Plate preset.
Well group: Click Larger/Smaller until the Area (in the Area column of the Plate Wells table) is 4765.
-
Assign background wells.
a. Click and drag to select the background wells (column 6).
b. On the Plate Analysis tab, select User Defined from the Background list.
c. Click OK to dismiss the User Defined Background dialog.
d. In the Background group, click Assign Wells.
-
Select images and choose data to export.
a. In the Images table, select the images to be analyzed. Click Filter > Selection.
b. In the Plate Wells table, clear the Display Current filter. Click Filter > Display Current.
-
Export Data.
Image Studio 4.x or 5.x: Click Report
 > Launch Spreadsheet
  above and to the right of the tables.
Image Studio 3.x or earlier: On the Table tab, click Launch Spreadsheet.
-
Ensure the data columns in the spreadsheet you exported from Image Studio are in the following order (as described above).

- Download the workbook.
-
Copy data from the spreadsheet you exported from Image Studio into the Data sheet of the workbook provided in step 2.
If "No" appears in the Column Name Match section of the Calculations sheet, the wrong columns are included or the columns are in the wrong order.
The CVs for well-to-well variation will be calculated and displayed in the Results sheet.
Interpret the Results
Coefficients of variation are displayed in the Results sheet. The maximum variation for all locations should be less than 6% for the 700 and 800 channel. The appropriate table cells in the Results sheet will be highlight yellow if CVs exceed 6%.
If you notice greater than 6% variability, email regulatory@licorbio.com.