Frequently Asked Questions
Work Areas allow you to organize your images and data by experiment, save software settings relevant to the experiment, and quickly reuse analysis templates to perform every analysis quickly and precisely. For more about using Work Areas, see the Work Area page.
Do not save your Work Area on a network drive. To transfer images and data between computers, export a Zip File.
If you only need to quantify a gel or blot with a few, well spaced shapes, a manual analysis may be all you need.
Use a DNA Gel, Western Analysis, or MPX Western Analysis to:
- Perform an analysis involving molecular weight markers or normalization.
- Reduce the amount of manual effort required to analyze gels and blots, especially gels and blots that contain many lanes and bands.
Signal = Total - (Background x Area)
Signal is the sum of the pixel intensity values (total) for a shape minus the product of the background and the area of the shape.
The background is multiplied by the area to correct the background value for the size of the shape being quantified, so the size of the shape does not need to be the same for each feature on an image.
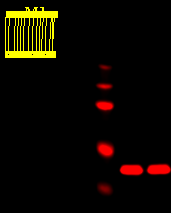
The grid on your image is from an add-on analysis. Sometimes people will reduce the size of the grid and move it to the side, in which case it may appear like the one shown below.
If you do not want to use the add-on analysis type, follow these steps.
-
On the Analysis tab, change the analysis to Manual in the Type group.
All data from the add-on analysis will be deleted before the new Manual analysis is applied. Manually added shapes and data from manually added shapes will remain.
- To prevent the add-on analysis type from being applied to newly acquired images automatically, open the Acquire tab and ensure the Analysis Type in the Setup group is set to Manual.
The analysis type setting in the Setup group is specific to the Work Area and instrument. If you change the setting to manual but switch to a different Work Area or connect to a different instrument, the setting may be different.
The best method for background correction depends on the image and its background consistency. Background must be subtracted to accurately calculate signal from the shape(s) of interest, especially if background values vary throughout an image.
Background options are explained by analysis type in the following sections.
- Western Blot and Gel Analyses
- Plate and Grid
- Small Animal Image
You can export an image, along with all Image Table data and analysis data, to an Image Studio Zip File.
Zip Files exported from Image Studio 3, 4, or 5 can be imported into Image Studio 3, 4, or 5.
-
Select the image or images in the Images Table to export.
- Click the Image Studio Application button
 .
. -
Point to Export, then Image Studio Files, and then click Zip File.
The Export to Zip File dialog will open.
- Choose where to save the Zip File, and click Save.
- Click the Image Studio Application button .
- Point to Import and then click Image Studio Zip File.
- In the Import Image Studio Zip File dialog, select the Zip File or Zip Files to be imported.
-
Click Open.
The Zip Files will be imported.